How to Use One Umbraco Instance to Host Multiple Sites
Hello! Maggy here on my long overdue second blog post in my Journal of a Junior series!
Hello! Maggy here on my long overdue second blog post in my Journal of a Junior series! This is my sixth month working at Space Between, I have worked on so many projects, with so many amazing technologies it was hard to pick what to write this post on. I’ve decided to go with using one Umbraco CMS instance to host multiple sites!
Umbraco CMS is open-source, free to use and also comes with a great community of developers. Here at Space Between we are big fans - so much that myself and Marcus did an Umbraco course and are now Certified Umbraco Developers!
I've chosen this because it was one of the tasks I thought was going to be very difficult. It involved so many things I'd never encountered before, and was a big learning curve - but very rewarding and now something that I realise can be done in a flash! This tutorial will assume you are familiar with the Umbraco CMS and being able set up different domain names in IIS for each site.
Step 1: Setting up
For those who haven't used Umbraco before, you can get your installation here.
I'm going to be showing the multisite we made for HRGO Recruitment in this example. You will want to start with creating some templates for your sites. I personally have used the same templates for each different site to save a huge library of unique templates. I prefer having reusable templates and this is very easy with the use of the Umbraco Grid and special grid editors. I won't go into this too much, as there are many resources on the web for this.
You will want a 'Homepage' document type, as well as a 'Website Settings'. These are a must - the homepage will be the start node, and in the website settings, we will set each websites unique stylesheet and settings. This isn't necessary but is good to know if each site is going to be different style wise.
In my Homepage I have the Umbraco Grid:

In my Website Settings, I have some text fields to enter the name or your stylesheet and also fonts.
Step 2: Allowing each site to have a unique domain
Once you've got Umbraco installed, you will want to go into umbracoSettings.config, and find '<requestHandler>' and set <useDomainPrefixes> to true. This allows you to have unique domains for multiple sites.

Step 3: Creating content for each site
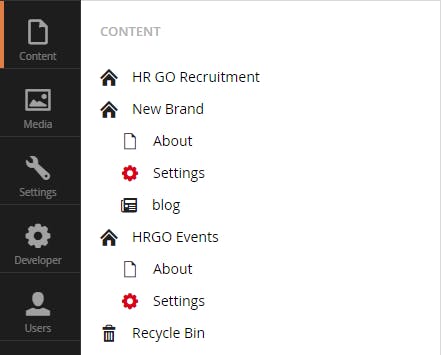
Now these have been made, we will create them in the Content tab. Remember to set up permissions to allow the Website Settings document to be a child of the Homepage, along with any other Doctypes you have made. It should look a little like the image below:
Now give each site its own unique content! If each site is having its own stylesheet or fonts, then this is where you will add them into the settings. First, you will want to make your stylesheets have been created. In the settings, you can add the file name and your link to the font you have chosen. I'm using google fonts, so I can just add the google link but this can easily be customised to suit you.
We used a helper class to get the website settings node:
<xmp>public static IPublishedContent GetWebsiteSettings(){ var umbracoHelper = new Umbraco.Web.UmbracoHelper(Umbraco.Web.UmbracoContext.Current); Node currentNode = Node.GetCurrent(); Node currentHomeNode = new Node(int.Parse(currentNode.Path.Split(',')[1])); var currentHome = umbracoHelper.TypedContent(currentHomeNode.Id); return currentHome.Children.Where(x => x.IsDocumentType("settings")).First();}</xmp>And Razor to assign the stylesheet to the template:
<xmp>@{ var websiteSettings = SettingsHelpers.GetWebsiteSettings(); var styleSheet = websiteSettings.GetProperty("styleSheet").Value; string fonts = websiteSettings.GetProperty("fontReference").Value.ToString(); string newRelicScript = websiteSettings.GetProperty("newRelicScript").Value.ToString();}<!-- Stylesheet from Umbraco--><link rel="stylesheet" href="/Css/dist/@styleSheet" /><!-- Fonts from Umbraco--><link rel="stylesheet" href="@fonts" /></xmp>
Step 4: Assigning domain names
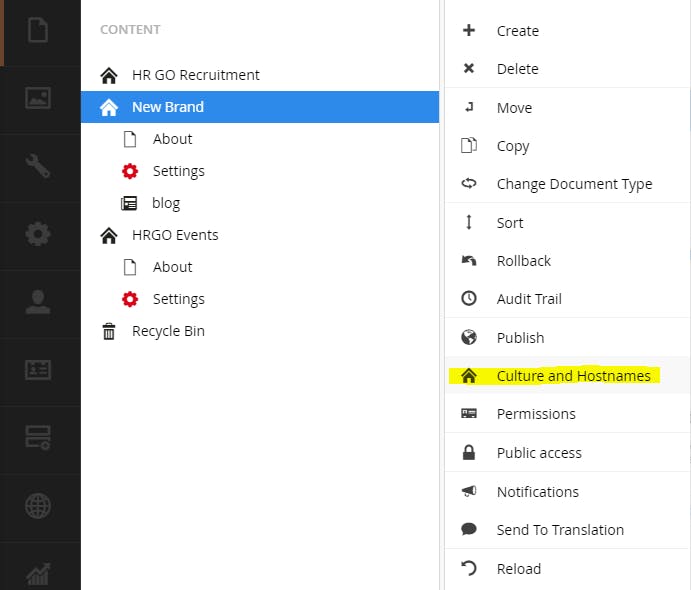
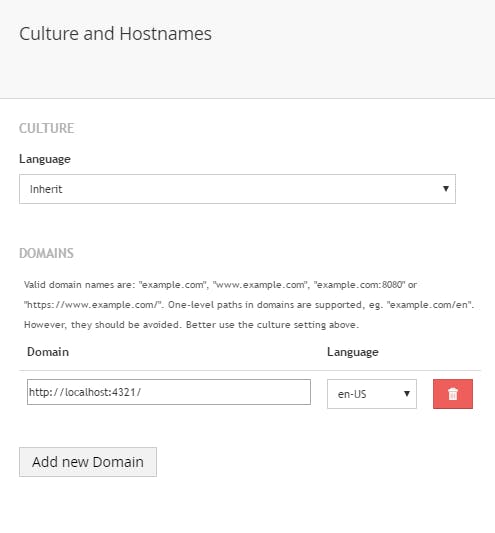
Now, we have our two websites! We just need to assign them their own domain names. To do this you will want to right click on the websites Home node, and then select 'Culture and Hostnames'.
This is where you will add the unique hostname and also website language if necessary.
You will want to make sure your domain names are pointing to the correct places with IIS. Here is a quick how-to on how I got the sites to show on unique localhost domains:
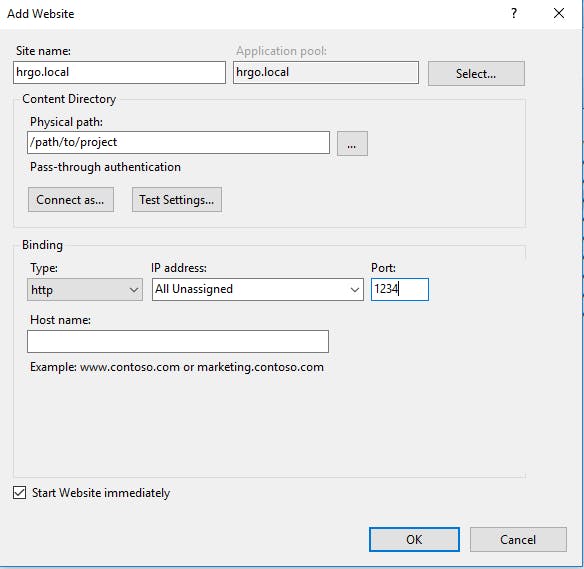
1. Open up IIS Manager
2. Right click on 'Sites' and then 'Add Site'
3. You will want to give your site a name, give the path to where your project is locally, and you will want to bind your site to a hostname.
4. You will also want to make sure that all users that need permissions have full access. Check this by going to 'Edit Permissions' and checking the Security tab.
Now we are all set up - let's test!
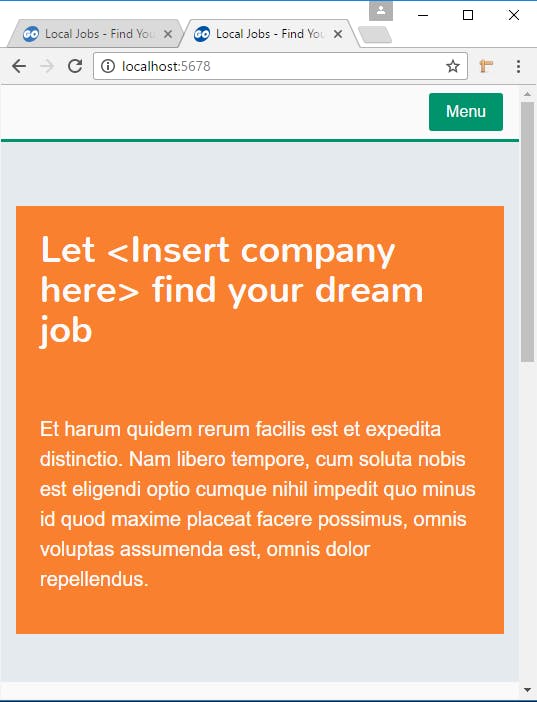
on localhost:1234 we have:

and on localhost:4321:
and that's my tutorial on creating multiple websites using just one Umbraco instance! Thanks for reading.